Isovalent Enterprise for Cilium can now be installed on Azure Kubernetes Service clusters using Azure Linux as the host Operating system. In this tutorial, you will learn how to:
Install AKS clusters running Azure CNI powered by Cilium with Azure Linux.
Migrate your existing clusters on Azure CNI powered by Cilium from Ubuntu to Azure Linux.
Upgrade your clusters from Azure CNI powered by Cilium running Azure Linux to Isovalent Enterprise for Cilium.
What is Isovalent Enterprise for Cilium?
Azure Kubernetes Service (AKS) uses Cilium natively, wherein AKS combines the robust control plane of Azure CNI with Cilium’s data plane to provide high-performance networking and security. Isovalent Cilium Enterprise is an enterprise-grade, hardened distribution of open-source projects Cilium, Hubble, and Tetragon, built and supported by the Cilium creators. Cilium enhances networking and security at the network layer, while Hubble ensures thorough network observability and tracing. Tetragon ties it all together with runtime enforcement and security observability, offering a well-rounded solution for connectivity, compliance, multi-cloud, and security concerns.
Why Isovalent Enterprise for Cilium?
For enterprise customers requiring support and usage of Advanced Networking, Security, and Observability features, “Isovalent Enterprise for Cilium” is recommended with the following benefits:
Advanced network policy: Isovalent Cilium Enterprise provides advanced network policy capabilities, including DNS-aware policy, L7 policy, and deny policy, enabling fine-grained control over network traffic for micro-segmentation and improved security.
Hubble flow observability + User Interface: Isovalent Cilium Enterprise Hubble observability feature provides real-time network traffic flow, policy visualization, and a powerful User Interface for easy troubleshooting and network management.
Multi-cluster connectivity via Cluster Mesh: Isovalent Cilium Enterprise provides seamless networking and security across multiple clouds, including public cloud providers like AWS, Azure, and Google Cloud Platform, as well as on-premises environments.
Advanced Security Capabilities via Tetragon: Tetragon provides advanced security capabilities such as protocol enforcement, IP and port whitelisting, and automatic application-aware policy generation to protect against the most sophisticated threats. Built on eBPF, Tetragon can easily scale to meet the needs of the most demanding cloud-native environments.
Service Mesh: Isovalent Cilium Enterprise provides seamless service-to-service communication that’s sidecar-free and advanced load balancing, making it easy to deploy and manage complex microservices architectures.
Enterprise-grade support: Isovalent Cilium Enterprise includes enterprise-grade support from Isovalent’s experienced team of experts, ensuring that any issues are resolved promptly and efficiently. Additionally, professional services help organizations deploy and manage Cilium in production environments.
How can you deploy Isovalent Enterprise for Cilium?
Isovalent Enterprise for Cilium is available in the Azure Marketplace. It can also be deployed using Azure Resource Manager (ARM) Templates and Azure CLI.
What is Azure Linux?
Microsoft announced the General Availability for Azure Linux Container Host in May 2023. Azure Linux is a lightweight operating system, containing only the packages needed for a cloud environment. Azure Linux can be customized through custom packages and tools, to fit the requirements of your application. Azure Kubernetes Services is one such application that uses production-grade container orchestration as an option for container hosting. The Azure Linux container host for AKS is an open-source Linux distribution created by Microsoft, and it’s available as a container host on Azure Kubernetes Service (AKS).
Why Azure Linux as the host OS?
A popular question you would ask is why choose Azure Linux as the host OS:
Optimized to run in Azure. Built, verified, and digitally signed by Microsoft .
Supply chain security.
Smaller and leaner Linux to reduce footprint, surface attack area, & optimize performance.
Operational consistency across Edge to Cloud.
Rigorous validation and testing of packages and images on AKS infrastructure.
Pre-Requisites
The following prerequisites must be considered before you proceed with this tutorial.
Azure CLI version 2.48.1 or later. Run az –version to see the currently installed version. If you need to install or upgrade, see Install Azure CLI.
If using ARM templates or the REST API, the AKS API version must be 2022–09–02-preview or later.
Ensure you have enough quota resources to create an AKS cluster. Go to the Subscription blade, navigate to “Usage + Quotas,” and make sure you have enough quota for the following resources: -Regional vCPUs -Standard Dv4 Family vCPUs
You can choose regions where the quotas are available and not strictly follow the regions picked up during this tutorial.
Limitations with Azure Linux Container Host
Azure Linux cannot yet be deployed through the Azure Portal.
Azure Linux doesn’t support AppArmor. Support for SELinux can be manually configured.
Creating an AKS cluster on Isovalent Enterprise for Cilium with Azure Linux as the host OS will be available in a future release.
Installing Azure Linux on Azure Kubernetes Service Clusters
The following combinations of installing and migrating AKS clusters with Azure Linux are supported.
Network Plugin
Default Nodepool OS (during AKS cluster creation)
Additional Nodepool OS (after AKS cluster creation)
Migration from Ubuntu to Azure Linux
Azure CNI (Powered by Cilium)-Overlay Mode
Azure Linux
Azure Linux
N.A
Azure CNI (Powered by Cilium)-Overlay Mode
Ubuntu
Azure Linux
Yes
Azure CNI (Powered by Cilium)-Dynamic IP Allocation Mode
Azure Linux
Azure Linux
N.A
Azure CNI (Powered by Cilium)-Dynamic IP Allocation Mode
Ubuntu
Azure Linux
Yes
Azure CNI (Powered by Cilium)-Overlay Mode to Isovalent Enterprise for Cilium
Azure Linux
N.A
N.A
Bring your own CNI (BYOCNI)
Azure Linux
Azure Linux
N.A
Bring your own CNI (BYOCNI)
Ubuntu
Azure Linux
Yes
N.A= Not Applicable
BYOCNI (Azure Linux) and BYOCNI (Ubuntu) have also been tested and validated. If you would like to get more information about them, you can get in touch with sales@isovalent.com and support@isovalent.com
Choosing the IMU for a Product?- Installation, Migration or Upgrade
You can take a look at this flowchart and then decide whether you would like to do:
A greenfield installation of your AKS cluster with Azure Linux
Upgrade/Migrate your existing AKS clusters from Ubuntu to Azure Linux
Scenario 1: AKS cluster on Azure CNI powered by Cilium in (Overlay mode) with Azure Linux
AKS Resource Group Creation
Create a Resource Group
az group create --name azpcoverlayal --location westus2
AKS Cluster creation
Create a cluster with Azure CNI Powered by Cilium with network-plugin as Azure, network-plugin-mode as Overlay, os-sku as AzureLinux and network-dataplane as Cilium.
Choose the subscription you want to use if you have multiple Azure subscriptions.
Replace SubscriptionName with your subscription name.
You can also use your subscription ID instead of your subscription name.
az account set --subscription SubscriptionName
Set the Kubernetes Context
Log in to the Azure portal, browse Kubernetes Services>, select the respective Kubernetes service created ( AKS Cluster), and click connect. This will help you connect to your AKS cluster and set the respective Kubernetes context.
az aks get-credentials --resource-group azpcoverlayal --name azpcoverlayal
Cluster Status Check
Check the status of the nodes and make sure they are in a ‘Ready’ state and are running ‘CBL-Mariner/Linux’ as the host OS.
kubectl get nodes -o wide
NAME                                STATUS   ROLES   AGE   VERSION   INTERNAL-IP   EXTERNAL-IP   OS-IMAGE            KERNEL-VERSION     CONTAINER-RUNTIME
aks-nodepool1-34896908-vmss000000   Ready    agent   47m   v1.26.6   10.224.0.4    <none>        CBL-Mariner/Linux   5.15.131.1-2.cm2   containerd://1.6.22
aks-nodepool1-34896908-vmss000001   Ready    agent   47m   v1.26.6   10.224.0.6    <none>        CBL-Mariner/Linux   5.15.131.1-2.cm2   containerd://1.6.22
aks-nodepool1-34896908-vmss000002   Ready    agent   47m   v1.26.6   10.224.0.5    <none>        CBL-Mariner/Linux   5.15.131.1-2.cm2   containerd://1.6.22
Add nodepool with OS-type as AzureLinux.
Add an Azure Linux node pool to your existing cluster.
Note- When adding a new Azure Linux node pool, you need to add at least one as --mode System . Otherwise, AKS will not allow you to delete your existing node pool.
az aks nodepool add --resource-group azpcoverlayal --cluster-name azpcoverlayal --name alnodepool --node-count 2 --os-sku AzureLinux --mode System
Cluster Status Check
Check the status of the newly added nodes and make sure they are in a ‘Ready’ state and are running ‘CBL-Mariner/Linux’ as the host OS.
Choose the subscription you want to use if you have multiple Azure subscriptions.
Replace SubscriptionName with your subscription name.
You can also use your subscription ID instead of your subscription name.
az account set --subscription SubscriptionName
Set the Kubernetes Context
Log in to the Azure portal, browse to Kubernetes Services>, select the respective Kubernetes service created ( AKS Cluster), and click connect. This will help you connect to your AKS cluster and set the respective Kubernetes context.
az aks get-credentials --resource-group azpcoverlayal --name azpcoverlay
Cluster Status Check
Check the status of the nodes and make sure they are in a ‘Ready’ state and are running ‘Ubuntu’ as the host OS.
Add an Azure Linux node pool to your existing cluster.
Note- When adding a new Azure Linux node pool, you need to add at least one as --mode System . Otherwise, AKS will not allow you to delete your existing node pool.
az aks nodepool add --resource-group azpcoverlay --cluster-name azpcoverlay --name alnodepool --node-count 2 --os-sku AzureLinux --mode System
Cluster Status Check
Check the status of the newly added nodes and make sure they are in a ‘Ready’ state and are running ‘CBL-Mariner/Linux’ as the host OS.
You can migrate the default nodes created while creating the AKS cluster and run Ubuntu as the host OS. This is optional; you can skip it if it is not required. Migration is a 3-part process:
Cordon the existing Nodes (Default)
Cordoning marks specified nodes as unschedulable and prevents any more pods from being added to the nodes.
First, obtain the names of the nodes you’d like to cordon with kubectl get nodes:
To successfully drain nodes and evict running pods, ensure that any PodDisruptionBudgets (PDBs) allow for at least 1 pod replica to be moved at a time; otherwise, the drain/evict operation will fail. To check this, you can run kubectl get pdb -A, and make sure ALLOWED DISRUPTIONS is at least 1 or higher.
kubectl get pdb -A
NAMESPACE     NAME                 MIN AVAILABLE   MAX UNAVAILABLE   ALLOWED DISRUPTIONS   AGE
kube-system   coredns-pdb          1               N/A               1                     68m
kube-system   konnectivity-agent   1               N/A               1                     68m
kube-system   metrics-server-pdb   1               N/A               1                     68m
Draining nodes will cause pods running on them to be evicted and recreated on the other schedulable nodes.
To drain nodes, use kubectl drain <node-names> --ignore-daemonsets --delete-emptydir-data, again using, a space-separated list of node names:
Note- Using --delete-emptydir-data is required to evict the AKS-created coredns and metrics-server pods. If this flag isn’t used, an error is expected.
To remove the existing nodes, use the az aks delete command. The final result is the AKS cluster having a single Azure Linux node pool with the desired SKU size and all the applications and pods properly running.
az aks nodepool delete \
    --resource-group azpcoverlay \
    --cluster-name azpcoverlay \
    --name nodepool1
Check the status of the nodes to ensure that the default node has been deleted and the additional node running AzureLinux is in a ‘Ready’ state:
kubectl get nodes -o wide
NAME                                 STATUS   ROLES   AGE   VERSION   INTERNAL-IP   EXTERNAL-IP   OS-IMAGE            KERNEL-VERSION     CONTAINER-RUNTIME
aks-alnodepool-38981809-vmss000000   Ready    agent   60m   v1.26.6   10.224.0.8    <none>        CBL-Mariner/Linux   5.15.131.1-2.cm2   containerd://1.6.22
aks-alnodepool-38981809-vmss000001   Ready    agent   60m   v1.26.6   10.224.0.7    <none>        CBL-Mariner/Linux   5.15.131.1-2.cm2   containerd://1.6.22
Scenario 3: AKS cluster on Azure CNI powered by Cilium (Dynamic IP mode) with Azure Linux
AKS Resource Group Creation
Create a Resource Group
az group create --name azpcvnet --location canadacentral
AKS Network creation
Create a virtual network with a subnet for nodes and a subnet for pods and retrieve the subnetID
Create an AKS cluster referencing the node subnet using –vnet-subnet-id and the pod subnet using –pod-subnet-id. Make sure to use the argument –network-plugin as azure, os-sku as AzureLinux and network-dataplane as cilium.
Choose the subscription you want to use if you have multiple Azure subscriptions.
Replace SubscriptionName with your subscription name.
You can also use your subscription ID instead of your subscription name.
az account set --subscription SubscriptionName
Set the Kubernetes Context
Log in to the Azure portal, browse Kubernetes Services>, select the respective Kubernetes service created ( AKS Cluster), and click connect. This will help you connect to your AKS cluster and set the respective Kubernetes context.
az aks get-credentials --resource-group azpcvnet --name azpcvnet
Cluster Status Check
Check the status of the nodes and make sure they are in a ‘Ready’ state and are running ‘CBL-Mariner/Linux’ as the host OS.
kubectl get nodes -o wide
NAME                                STATUS   ROLES   AGE     VERSION   INTERNAL-IP   EXTERNAL-IP   OS-IMAGE            KERNEL-VERSION     CONTAINER-RUNTIME
aks-nodepool1-35610968-vmss000000   Ready    agent   56m     v1.26.6   10.240.0.5    <none>        CBL-Mariner/Linux   5.15.131.1-2.cm2   containerd://1.6.22
aks-nodepool1-35610968-vmss000001   Ready    agent   55m     v1.26.6   10.240.0.4    <none>        CBL-Mariner/Linux   5.15.131.1-2.cm2   containerd://1.6.22
aks-nodepool1-35610968-vmss000002   Ready    agent   56m     v1.26.6   10.240.0.6    <none>        CBL-Mariner/Linux   5.15.131.1-2.cm2   containerd://1.6.22
Add nodepool with OS-type as AzureLinux.
Add an Azure Linux node pool to your existing cluster. In the case of Azure CNI (Dynamic IP allocation), you need to add a new subnet for pods and nodes in addition to what was created originally at the time of the AKS cluster creation.
Note- When adding a new Azure Linux node pool, you need to add at least one as --mode System . Otherwise, AKS will not allow you to delete your existing node pool.
Create an AKS cluster referencing the node subnet using –vnet-subnet-id and the pod subnet using –pod-subnet-id. Make sure to use the argument –network-plugin as azure and network-dataplane as cilium.
Choose the subscription you want to use if you have multiple Azure subscriptions.
Replace SubscriptionName with your subscription name.
You can also use your subscription ID instead of your subscription name.
az account set --subscription SubscriptionName
Set the Kubernetes Context
Log in to the Azure portal, browse to Kubernetes Services>, select the respective Kubernetes service created ( AKS Cluster), and click connect. This will help you connect to your AKS cluster and set the respective Kubernetes context.
az aks get-credentials --resource-group azpcvnet1 --name azpcvnet1
Cluster Status Check
Check the status of the nodes and make sure they are in a ‘Ready’ state and are running ‘Ubuntu’ as the host OS.
Add an Azure Linux node pool to your existing cluster. In the case of Azure CNI (Dynamic IP allocation), you need to add a new subnet for pods and nodes in addition to what was created originally at the time of the AKS cluster creation.
Note- When adding a new Azure Linux node pool, you need to add at least one as --mode System . Otherwise, AKS will not allow you to delete your existing node pool.
You can migrate the default nodes created while creating the AKS cluster and run Ubuntu as the host OS. This is optional; if not required, you can skip this step. Migration is a 3-part process:
Cordon the existing Nodes (Default)
Cordoning marks specified nodes as unschedulable and prevents any more pods from being added to the nodes.
First, obtain the names of the nodes you’d like to cordon with kubectl get nodes:
To successfully drain nodes and evict running pods, ensure that any PodDisruptionBudgets (PDBs) allow for at least 1 pod replica to be moved at a time; otherwise, the drain/evict operation will fail. To check this, you can run kubectl get pdb -A, and make sure ALLOWED DISRUPTIONS is at least 1 or higher.
kubectl get pdb -A
NAMESPACE     NAME                 MIN AVAILABLE   MAX UNAVAILABLE   ALLOWED DISRUPTIONS   AGE
kube-system   coredns-pdb          1               N/A               1                     68m
kube-system   konnectivity-agent   1               N/A               1                     68m
kube-system   metrics-server-pdb   1               N/A               1                     68m
Draining nodes will cause pods running on them to be evicted and recreated on the other schedulable nodes.
To drain nodes, use kubectl drain <node-names> --ignore-daemonsets --delete-emptydir-data, again, a space-separated list of node names:
Note- Using --delete-emptydir-data is required to evict the AKS-created coredns and metrics-server pods. If this flag isn’t used, an error is expected.
To remove the existing nodes, use the az aks delete command. The final result is the AKS cluster having a single Azure Linux node pool with the desired SKU size and all the applications and pods properly running.
az aks nodepool delete \
    --resource-group azpcvnet1 \
    --cluster-name azpcvnet1 \
    --name nodepool1
Check the status of the nodes to ensure that the default node has been deleted and the additional node running AzureLinux is in a ‘Ready’ state:
kubectl get nodes -o wide
NAME                                 STATUS   ROLES   AGE   VERSION   INTERNAL-IP   EXTERNAL-IP   OS-IMAGE            KERNEL-VERSION     CONTAINER-RUNTIME
aks-azpclinux1-23905787-vmss000000   Ready    agent   48m   v1.26.6   10.242.0.5    <none>        CBL-Mariner/Linux   5.15.131.1-2.cm2   containerd://1.6.22
aks-azpclinux1-23905787-vmss000001   Ready    agent   48m   v1.26.6   10.242.0.4    <none>        CBL-Mariner/Linux   5.15.131.1-2.cm2   containerd://1.6.22
Scenario 5: In-place OS SKU migration (preview)
You can now migrate your existing Ubuntu node pools to Azure Linux by changing the OS SKU of the node pool, which rolls the cluster through the standard node image upgrade process. This new feature doesn’t require the creation of new node pools.
Install the aks-preview extension.
Install the aks-preview extension using the az extension add command.
az extension add --name aks-preview
Register the OSSKUMigrationPreview feature flag
Register the OSSKUMigrationPreview feature flag on your subscription using the az feature register command.
az feature register --namespace Microsoft.ContainerService --name OSSKUMigrationPreview
Check the registration status using the az feature list command.
az feature list -o table --query "[?contains(name, 'Microsoft.ContainerService/OSSKUMigrationPreview')].{Name:name,State:properties.state}"Name State
------------------------------------------------ ----------
Microsoft.ContainerService/OSSKUMigrationPreview Registered
Refresh the registration of the OSSKUMigrationPreview feature flag using the az provider register command.
az provider register --namespace Microsoft.ContainerService
Set the Subscription
Choose the subscription you want to use if you have multiple Azure subscriptions.
Replace SubscriptionName with your subscription name.
You can also use your subscription ID instead of your subscription name.
az account set --subscription SubscriptionName
Set the Kubernetes Context
Log in to the Azure portal, browse Kubernetes Services>, select the respective Kubernetes service created ( AKS Cluster), and click connect. This will help you connect to your AKS cluster and set the respective Kubernetes context.
az aks get-credentials --resource-group azpcvnet1 --name azpcvnet1
Note-You can use an existing scenario to see how OS SKU migration occurs on an existing AKS cluster running Ubuntu as the host OS.
Migrate the OS SKU of your Ubuntu node pool.
Migrate the OS SKU of your node pool to Azure Linux using the az aks nodepool update command. This command updates the OS SKU for your node pool from Ubuntu to Azure Linux. The OS SKU change triggers an immediate upgrade operation, which takes several minutes to complete.
az aks nodepool update --resource-group azpcvnet1 --cluster-name azpcvnet1 --name azpcvnet1 --os-sku AzureLinux
Once the migration is complete on your test clusters, you should verify the following to ensure a successful migration:
If your migration target is Azure Linux, run the kubectl get nodes -o wide command. The output should show CBL-Mariner/Linux as your OS image and .cm2 at the end of your kernel version.
Run the kubectl get pods -o wide -A command to verify that your pods and daemonsets are running on the new node pool.
Run the kubectl get nodes --show-labels command to verify that all of the node labels in your upgraded node pool are what you expect.
Blue-green deployments allow you to run multiple versions of your application side by side and do a clean cutover from v1 to v2. You would bring v2 of your application live, next to production, and have the ability to test it out without impacting production. Once you’re happy with v2, you will switch production from blue to green.
The easiest way to set up blue-green deployments is by using the Service object in Kubernetes. In the example below, you can deploy a blue and green service and observe how the traffic is switched from green to blue while the upgrade continues. In between, the traffic is also manually switched back to green to see if there are no traffic drops.
Deployment
Create a deployment myapp-blue
apiVersion: apps/v1
kind: Deployment
metadata:name: myapp-blue
spec:replicas:1selector:matchLabels:app: myapp
version: blue
template:metadata:labels:app: myapp
version: blue
spec:containers:-name: nginx
image: nginx
ports:-containerPort:80
Create a deployment myapp-green
apiVersion: apps/v1
kind: Deployment
metadata:name: myapp-green
spec:replicas:1selector:matchLabels:app: myapp
version: green
template:metadata:labels:app: myapp
version: green
spec:containers:-name: nginx
image: nginx
ports:-containerPort:80
kubectl get deployments
NAME READY UP-TO-DATE AVAILABLE AGE
myapp-blue 1/1 11 169m
myapp-green 1/1 11 168m
Creation of pods- the deployments will lead to creation of two distinct pods with prefixes myapp-blue-* and myapp-green-*. They should be up and running.
kubectl get pods -o wide
NAME READY STATUS RESTARTS AGE IP NODE NOMINATED NODE READINESS GATES
myapp-blue-64b65f55d5-w5xr6 1/1 Running 0 144m 10.0.4.81 aks-nodepool1-32804940-vmss000001 <none><none>myapp-green-545dbf78db-qqsxj 1/1 Running 0 146m 10.0.3.12 aks-nodepool1-32804940-vmss000000 <none><none>
Create a service object (svc.yaml) and apply the service object.
apiVersion: v1
kind: Service
metadata:name: myapp
spec:selector:app: myapp
version: blue
ports:-name: http
port:80targetPort:80type: LoadBalancer
kubectl apply -f svc.yaml
Ensure that the service has a Public IP (Optional).
kubectl get svc
NAME TYPE CLUSTER-IP EXTERNAL-IP PORT(S) AGE
kubernetes ClusterIP 10.0.0.1 <none>443/TCP 23h
myapp LoadBalancer 10.0.65.57 20.235.182.29 80:30383/TCP 174m
Traffic generation and upgrade
Before the upgrade, you can send traffic toward the public IP of the myapp Service (Load Balancer), which has previously created pods as its backend.
Initiate the upgrade on the nodepool nodepool-name for the cluster. (nodepool1 in this case)
Notice that the green app is running on node 1.
kubectl get pods -o wide
NAME READY STATUS RESTARTS AGE IP NODE NOMINATED NODE READINESS GATES
myapp-blue-64b65f55d5-w5xr6 1/1 Running 0 4h54m 10.0.4.81 aks-nodepool1-32804940-vmss000002 <none><none>myapp-green-545dbf78db-qqsxj 1/1 Running 0 4h56m 10.0.3.12 aks-nodepool1-32804940-vmss000001 <none><none>
Edit the service object and change the selector type to blue. Notice that the blue app is running on node 2
Notice that nodes are upgraded from Ubuntu to Azure Linux without traffic disruption.
As the upgrade proceeds, the apps are moved to nodes node0 and node1, respectively, but the user experience is not compromised.
Scenario 6: AKS cluster on Isovalent Enterprise for Cilium with Azure Linux
Note- You can upgrade your existing clusters as described in Scenarios 1 to 4 to Isovalent Enterprise for Cilium through Azure Marketplace. We have chosen one of those options to highlight the upgrade process. The steps for upgrading all the 4 scenarios are the same.
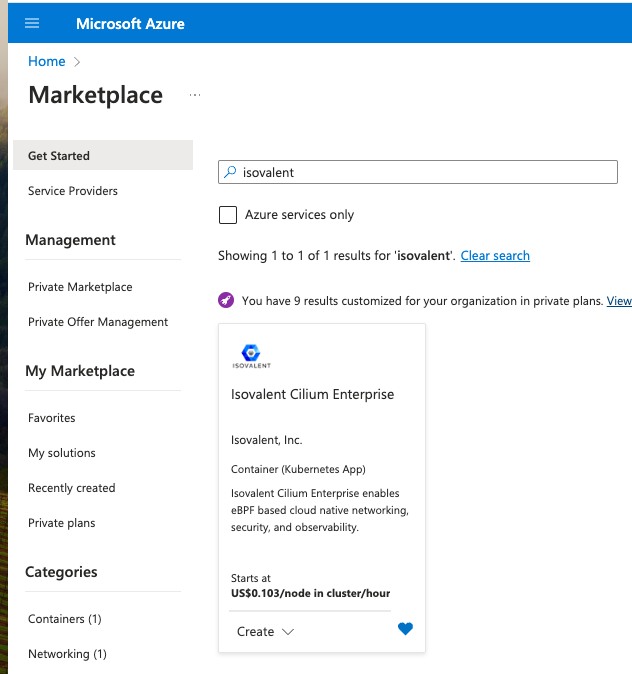
In the Azure portal, search for Marketplace on the top search bar. In the results, under Services, select Marketplace.
Type ‘Isovalent’ In the search window and select the offer.
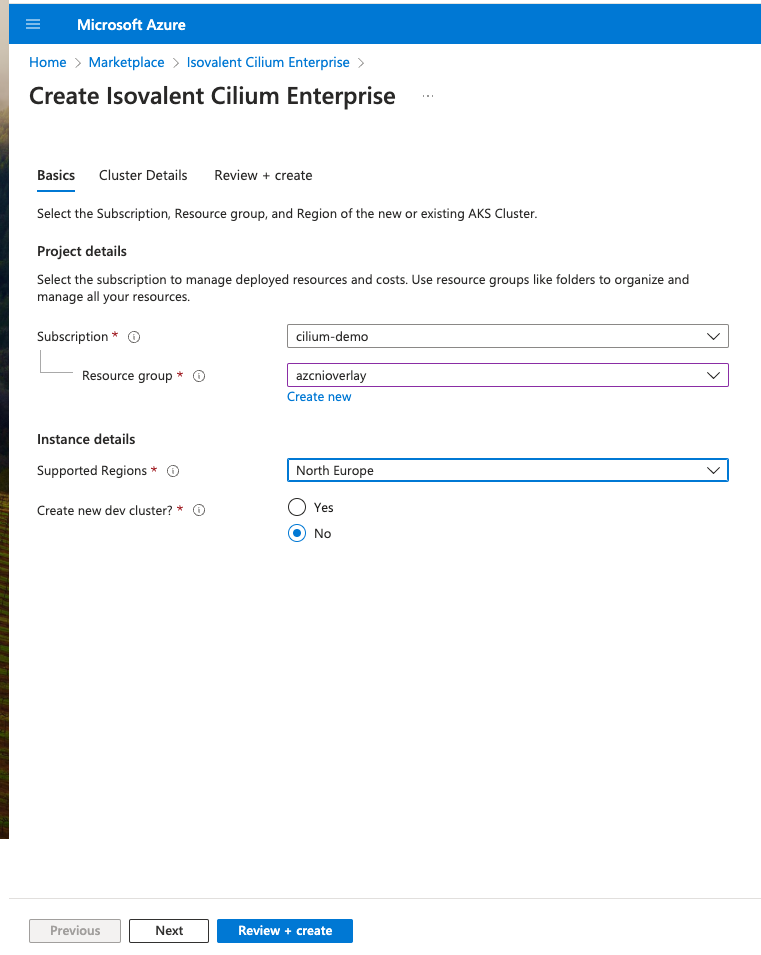
On the Plans + Pricing tab, select an option. Ensure that the terms are acceptable, and then select Create.
Select the resource group in which the cluster exists that we will be upgraded.
Click Create New Dev Cluster, select ‘No,’ and click Next: Cluster Details.
As ‘No’ was selected, this will upgrade an already existing cluster in that region.
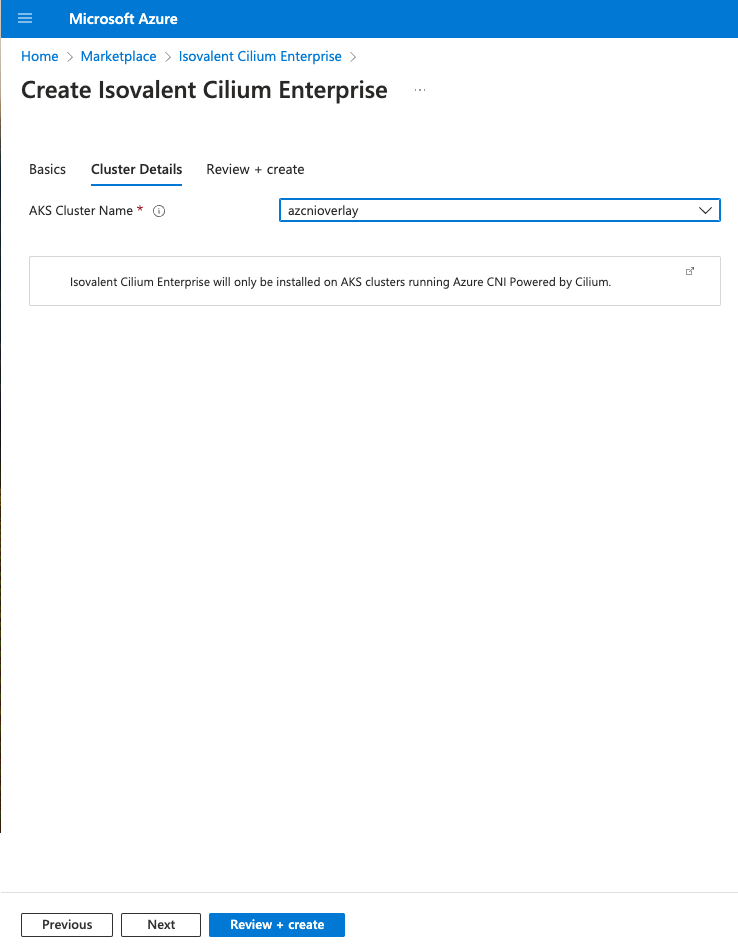
The name for the AKS cluster will be auto-populated by clicking on the drop-down selection.
Click ‘Next: Review + Create’ Details.
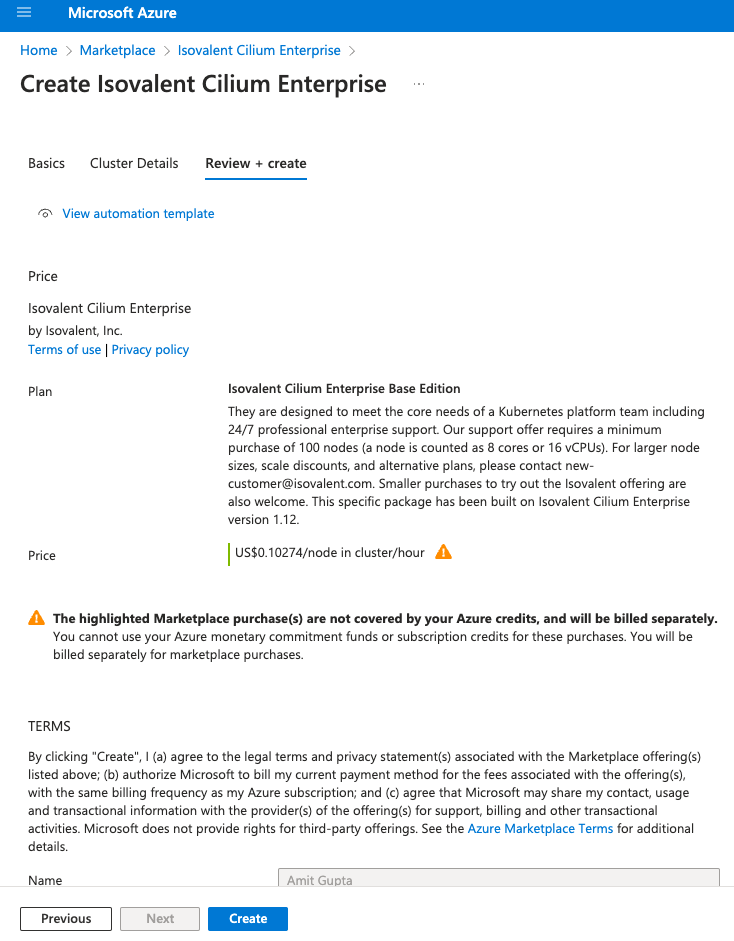
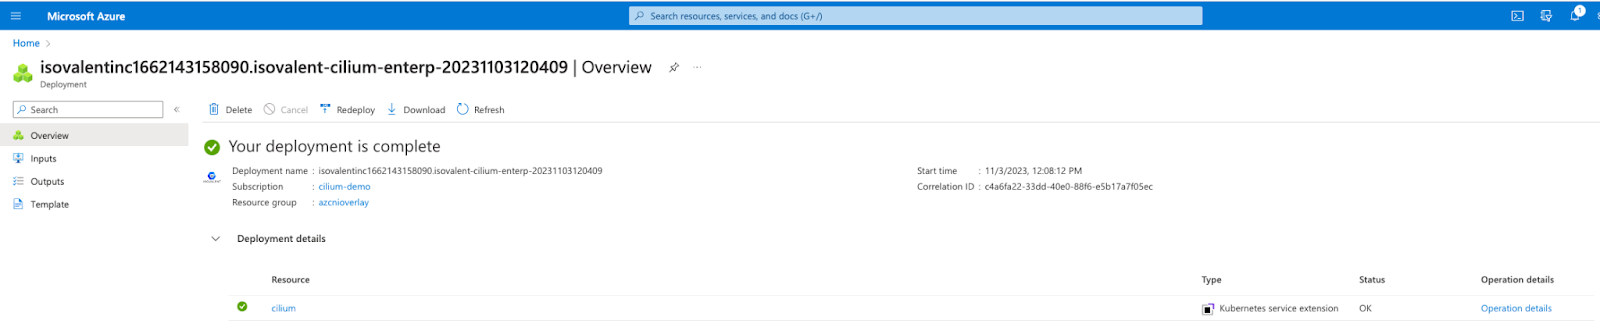
Once Final validation is complete, click ‘Create.’
When the application is deployed, the portal will show ‘Your deployment is complete,’ along with deployment details.
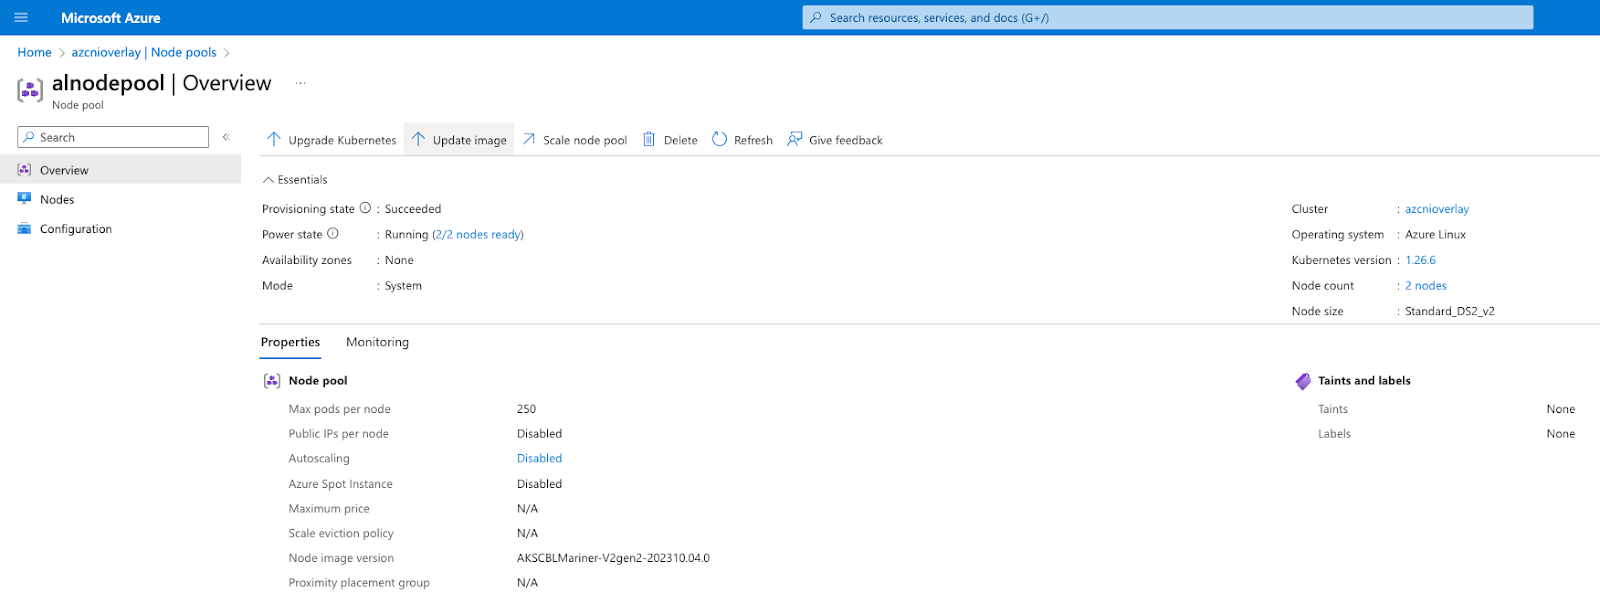
Verify that the nodes are running Azure Linux. Click > Resource Groups> Kubernetes Services> Select the AKS cluster> Nodepools
How do you upgrade Azure Linux Container Host Nodes?
The Azure Linux Container Host ships updates through Updated Azure Linux node images.
Note- Ensure you have an AKS cluster running Azure Linux or migrated to Azure Linux by following the steps outlined in the previous sections.
Manually upgrade your cluster.
To manually upgrade the node-image on a cluster:
az aks nodepool upgrade \
    --resource-group azcnial \
    --cluster-name azcnial \
    --name alnodepool \
    --node-image-only
Validation- Isovalent Enterprise for Cilium
Validate the version of Isovalent Enterprise for Cilium
Check the version of Isovalent Enterprise for Cilium with cilium version:
kubectl -n kube-system exec ds/cilium -- cilium version
Defaulted container "cilium-agent" out of: cilium-agent, config (init), mount-cgroup (init), apply-sysctl-overwrites (init), mount-bpf-fs (init), clean-cilium-state (init), install-cni-binaries (init)Client: 1.13.4-cee.1 22f99e91 2023-06-15T03:11:44+00:00 go version go1.19.10 linux/amd64
Daemon: 1.13.4-cee.1 22f99e91 2023-06-15T03:11:44+00:00 go version go1.19.10 linux/amd64
Cilium Health Check
cilium-health is a tool available in Cilium that provides visibility into the overall health of the cluster’s networking connectivity. You can check node-to-node health with cilium-health status:
kubectl -n kube-system exec ds/cilium -- cilium-health status
Defaulted container "cilium-agent" out of: cilium-agent, config (init), mount-cgroup (init), apply-sysctl-overwrites (init), mount-bpf-fs (init), clean-cilium-state (init), install-cni-binaries (init)Probe time: 2023-11-02T13:13:21Z
Nodes:
aks-al nodepool-38475519-vm 000001 (localhost):
Host connectivity to 10.240.0.120:
ICMP to stack: OK, RTT=342.3µs
HTTP to agent: OK, RTT=321.801µs
Endpoint connectivity to 10.0.3.230:
ICMP to stack: OK, RTT=346.601µs
HTTP to agent: OK, RTT=995.002µs
aks-alnodepool-38475519-vmss000000:
Host connectivity to 10.240.0.91:
ICMP to stack: OK, RTT=2.584705ms
HTTP to agent: OK, RTT=1.347503ms
Endpoint connectivity to 10.0.4.49:
ICMP to stack: OK, RTT=633.301µs
HTTP to agent: OK, RTT=4.180909ms
Cilium Connectivity Test
The Cilium connectivity test deploys a series of services and deployments, and CiliumNetworkPolicy will use various connectivity paths to connect. Connectivity paths include with and without service load-balancing and various network policy combinations.
The cilium connectivity test was run for all of the above scenarios, and the tests were passed successfully. A truncated output for one such test result is added.
cilium connectivity testℹ️ Monitor aggregation detected, will skip some flow validation steps
✨ [azpcvnet] Creating namespace cilium-test for connectivity check...
✨ [azpcvnet] Deploying echo-same-node service...
✨ [azpcvnet] Deploying DNS test server configmap...
✨ [azpcvnet] Deploying same-node deployment...
✨ [azpcvnet] Deploying client deployment...
✨ [azpcvnet] Deploying client2 deployment...
✨ [azpcvnet] Deploying echo-other-node service...
✨ [azpcvnet] Deploying other-node deployment...
✨ [host-netns] Deploying byocni daemonset...
✨ [host-netns-non-cilium] Deploying byocni daemonset...
✨ [azpcvnet] Deploying echo-external-node deployment...
⌛ [azpcvnet] Waiting for deployments [client client2 echo-same-node] to become ready...
⌛ [azpcvnet] Waiting for deployments [echo-other-node] to become ready...
⌛ [azpcvnet] Waiting for CiliumEndpoint for pod cilium-test/client-6f6788d7cc-qzvl2 to appear...
⌛ [azpcvnet] Waiting for CiliumEndpoint for pod cilium-test/client2-bc59f56d5-7d9nx to appear...
⌛ [azpcvnet] Waiting for pod cilium-test/client-6f6788d7cc-qzvl2 to reach DNS server on cilium-test/echo-same-node-6d449fcc4-9r7wb pod...
⌛ [azpcvnet] Waiting for pod cilium-test/client2-bc59f56d5-7d9nx to reach DNS server on cilium-test/echo-same-node-6d449fcc4-9r7wb pod...
⌛ [azpcvnet] Waiting for pod cilium-test/client-6f6788d7cc-qzvl2 to reach DNS server on cilium-test/echo-other-node-5dbf9455cb-p2662 pod...
⌛ [azpcvnet] Waiting for pod cilium-test/client2-bc59f56d5-7d9nx to reach DNS server on cilium-test/echo-other-node-5dbf9455cb-p2662 pod...
⌛ [azpcvnet] Waiting for pod cilium-test/client-6f6788d7cc-qzvl2 to reach default/kubernetes service...
⌛ [azpcvnet] Waiting for pod cilium-test/client2-bc59f56d5-7d9nx to reach default/kubernetes service...
🏃 Running tests...
✅ All 42 tests (313 actions) successful, 12 tests skipped, 1 scenarios skipped.
Caveats/ Troubleshooting
If you add a nodepool with network plugins Azure CNI Dynamic IP or Azure CNI powered by Cilium and a different/new subnet for both pods and nodes has not been added, you will observe this error.
az aks nodepool add --resource-group azpcvnet --cluster-name azpcvnet --name azpcvnet --node-count 2 --os-sku AzureLinux --mode System
The behavior of this command has been altered by the following extension: aks-preview
(InvalidParameter) All or none of the agentpools should set podsubnet
Code: InvalidParameter
Message: All or none of the agentpools should set podsubnet
If you are deleting a nodepool in any of the above scenarios that have been explained, ensure that there is one nodepool that was created with --mode Systemelse you will observe this error.
az aks nodepool delete \
    --resource-group azpcvnet \
    --cluster-name azpcvnet \
    --name nodepool1
The behavior of this command has been altered by the following extension: aks-preview
(OperationNotAllowed) There has to be at least one system agent pool.
Code: OperationNotAllowed
Message: There has to be at least one system agent pool.
Conclusion
Hopefully, this post gave you a good overview of installing or migrating your existing or new AKS clusters running Azure CNI powered by Cilium with Azure Linux and upgrading to Isovalent Enterprise for Cilium. If you have any feedback on the solution, please share it with us. You’ll find us on the Cilium Slack channel.
Amit Gupta is a Senior Technical Marketing Engineer at Isovalent that is powering eBPF cloud-native networking and security. Amit has 20+ years of experience in Networking, Telecommunications, Cloud, Security, and Open-Source and has worked in the past with companies like Motorola, Juniper, Avi Networks (acquired by VMware), and Prosimo. He is keen to learn and try out new technologies that aid in solving day-to-day problems for operators and customers.
He has worked in the Indian start-up ecosystem for a long time and helps new folks in that area in his time outside of work. Amit is an avid runner and cyclist and also spends a considerable amount of time helping kids in orphanages.
In this tutorial, users will learn how to deploy Isovalent Enterprise for Cilium on your AKS cluster from Azure Marketplace on a new cluster and also upgrade an existing cluster from an AKS cluster running Azure CNI powered by Cilium to Isovalent Enterprise for Cilium.
In this tutorial, you will learn how to enable Enterprise features (Layer-3, 4 & 7 policies, DNS-based policies, and observe the Network Flows using Hubble-CLI) in an Azure Kubernetes Service (AKS) cluster running Isovalent Enterprise for Cilium.
Amit Gupta
Industry insights you won’t delete. Delivered to your inbox weekly.